Introduction
This summer, my partner and I joined the ranks of proud pet parents. Every day has been a joy watching our little furball grow. However, with my partner’s office commitments, she’s been missing out on some of those precious moments. And like most new pet owners, we occasionally need to leave our puppy for short errands, like grocery runs. Concerned about leaving him alone, my partner pitched the idea of installing a couple cameras in the apartment. This way, not only could we monitor our puppy when we’re out, but she could also catch live snippets during her office breaks — a perfect midday morale boost!
With our criteria in mind, I embarked on the search for the perfect pet camera. But, as the title hints, the journey had its own twists and turns. Stick around as I unravel our tech escapade.
But first, here’s a mandatory snapshot of our adorable puppy, Loco.

Search for an off-the-shelf solution
Diving into the vast ocean that is Amazon’s wireless camera selection, I was instantly inundated with choices. Whether you’re looking for indoor or rugged outdoor models boasting an IP66 rating, there’s something for everyone. And, the price tags were pleasantly surprising too, ranging between ₹1000 to ₹5000 (approximately $12 to $60).
Sticking to my budget, I focused on the lower end of that spectrum. Beyond just price, I was impressed with the range in field of view, spanning from 105° to the panoramic 360°. Notably, those 360° models even sported a nifty motorized control for dynamic camera direction adjustments. And here’s a feature I deemed essential: IR night vision. Thankfully, the majority boasted a decent 10-meter range.
The setup seemed pretty straightforward for most of these cameras:
- Unbox and power up the camera.
- Install the accompanying app on your smartphone and click on “Add device” or a variant of this function in the app.
- Wait for the camera to turn on a wireless network to which the app would automatically connect.
- The app would then show a screen on which you’d have to configure the WiFi credentials of your home network.
- Now the camera would connect to the configured network and come online, and the smartphone app would provide the options to control the camera functions, such as, change capture resolution, turn on privacy mode, night mode etc, click pictures, configure notifications (based on movement or human detection), schedule reboot time, and controlling motors to change the direction of the camera (if the camera supports it).
The instructions are simple to follow and the accompanying app makes the process quite simple. Going by the reviews, most folks didn’t have any issues with setting the camera up.
So, problem solved with a quick Amazon search? Not quite. Stay tuned for the twist.
Issues with consumer grade options
Delving deeper into the features of these wireless cameras, it’s evident that while they boast advanced capabilities like AI motion detection, smart notifications, two-way communication, and even motion-triggered alarms, there’s a catch. Almost all of these features necessitate a constant internet connection. Although many cameras offer a microSD slot to locally archive footage (with an auto-rotation system to optimize storage), they lack the in-built hardware for on-device AI or motion detection. Instead, they transmit frames to company servers for processing. Now, when you consider placing such a device inside your home, alarm bells concerning privacy might start ringing.
Moreover, the near-mandatory requirement of a dedicated smartphone app for controlling these cameras posed another concern for me. Personally, I’m not a fan of cluttering my phone with additional apps. How much more convenient would it be if these cameras offered a web interface? A simple browser-accessible page that allows users to toggle settings and monitor footage would enable more versatile access across devices, without the need to download specific apps. Alas, the consumer grade devices I looked at on Amazon India don’t offer them.
Requirements
As I delved deeper into my camera quest, it became increasingly clear that my needs weren’t quite aligned with the standard offerings. Rather than just a basic streaming solution, I needed specific capabilities from my camera setup. Here’s the list I came up with:
Must-haves:
- On-demand video streaming over my local home network.
- Zero-trust security, ensuring robust safety protocols even when accessed over the internet.
Nice-to-haves (but not deal-breakers):
- On-demand audio streaming within the home network.
- Two-way communication over the same network.
On the flip side, there were features commonly found in many camera models that I realized I had no use for:
- Motion and AI detection or facial recognition capabilities.
- Constant pings in the form of alerts and notifications.
- A Network Video Recorder – I had no intentions of storing lengthy footage.
Given this clarity, the next challenge was finding a camera that matched this criterion. The offerings on Amazon, while packed with features, provided several capabilities I’d never tap into. But, ever the engineer, I wasn’t just thinking about the present — I wanted a solution that was flexible enough for future adaptations. This steered me towards a DIY approach, charting a course that would allow me to customize my camera setup just the way I wanted.
Foundations for my HomeLab
Venturing down the DIY route for my camera setup didn’t come out of the blue. To understand my confidence, let’s journey back in time.
Back in 2016, I’d purchased a Raspberry Pi 3B, eager to dabble with the Sensehat and immerse myself in the wonders of this platform. Come 2020, as the pandemic forced many of us indoors, I breathed new life into the Pi. Its mission? To function as a DNS blackhole within my home network, initially via PiHole and later transitioning to AdGuard Home.
However, 2022 threw in a curveball. Upon relocating to Bengaluru, frequent power disruptions became an issue. My trusty Pi bore the brunt of these interruptions, with its microSD card often getting corrupted. I’d admittedly been a tad thrifty, avoiding a UPS for the Pi. Instead, I pivoted to running AdGuard Home on my laptop, given its centrality in my daily routine.
But summer 2023 took the power woes up a notch. Work interruptions became the norm, prompting me to finally invest in an inverter power backup for our apartment. With uninterrupted power now a reality, the Raspberry Pi reemerged, this time, helming my modest homelab. The complete setup calls for another blog post, but I’ll summarize what I run on it.
- Portainer: All Raspberry services run on Docker. Having Portainer offers a sleek GUI to seamlessly execute compose files.
- AdGuard Home: Serving as my home network’s DNS blackhole (and more), it’s woven into my ISP’s router. Custom blocklists ensure I sidestep intrusive ads and potentially harmful sites.
- Netdata: This nimble monitoring tool keeps a watchful eye on my homelab’s pulse. While I cherish its real-time metrics, I’m plotting to harness its alert and notification systems in the near future.
- Nginx Proxy Manager: Juggling multiple ports for varied services can be tiresome. Enter Nginx Proxy Manager, which helps set up reverse proxies via a user-friendly interface, easing my navigation.
- homepage: A clean dashboard that congregates links for all my Pi services. I’ve also peppered in some handy information widgets. Down the line, I aim to craft bespoke widgets to boost its efficacy for my homelab.
Given the existing decent homelab setup, there was little doubt in my mind. I was well-equipped to craft a tailor-made solution for my pet camera, leveraging both the software and hardware stack at my disposal.
A primer in Virtual Local Area Network (VLAN)
Before delving into the solution, it’s essential to address a foundational requirement: ensuring the camera device remains isolated from the internet. This is where the concept of a VLAN, or Virtual Local Area Network, becomes invaluable.
At its core, a VLAN is a virtualized network segment, enabling the amalgamation of devices and network nodes from different physical LANs into a single, cohesive logical network.
“A virtual local area network (VLAN) is a digital layer that can group multiple devices from varied LANs, making them operate as if they were located on the same LAN, even if they’re not.”
Source: Solarwinds
For many homeowners, modern routers provided by ISPs, like the TPLink Archer C5 v4 I’m using, have begun integrating VLAN capabilities. This is significant for home networking, adding layers of security and segmentation. Although these routers are typically managed by the ISPs for basic configurations such as PPoE connections and firmware updates, they often allow users ample leeway to configure other advanced settings.
The TPLink Archer C5 v4, in particular, boasts 4 ethernet ports, supports both 2.4GHz and 5GHz wireless frequencies, and facilitates the creation of up to 6 additional wireless networks (3 for each frequency). This versatility is especially useful for implementing VLANs.
Here’s the strategy for creating a secure IoT environment:
- Establish a New Wireless Network: For clarity, let’s name this network
SS_IOT. - Initiate a VLAN: Associate only the
SS_IOTnetwork with this VLAN. Consequently, any device connecting to this network will be relegated to a distinct subnet, ensuring effective network partitioning. - Restrict Internet Access: For this VLAN, disable WAN access to ensure devices on this network cannot reach the internet.
Here’s how I setup another wireless SSID:
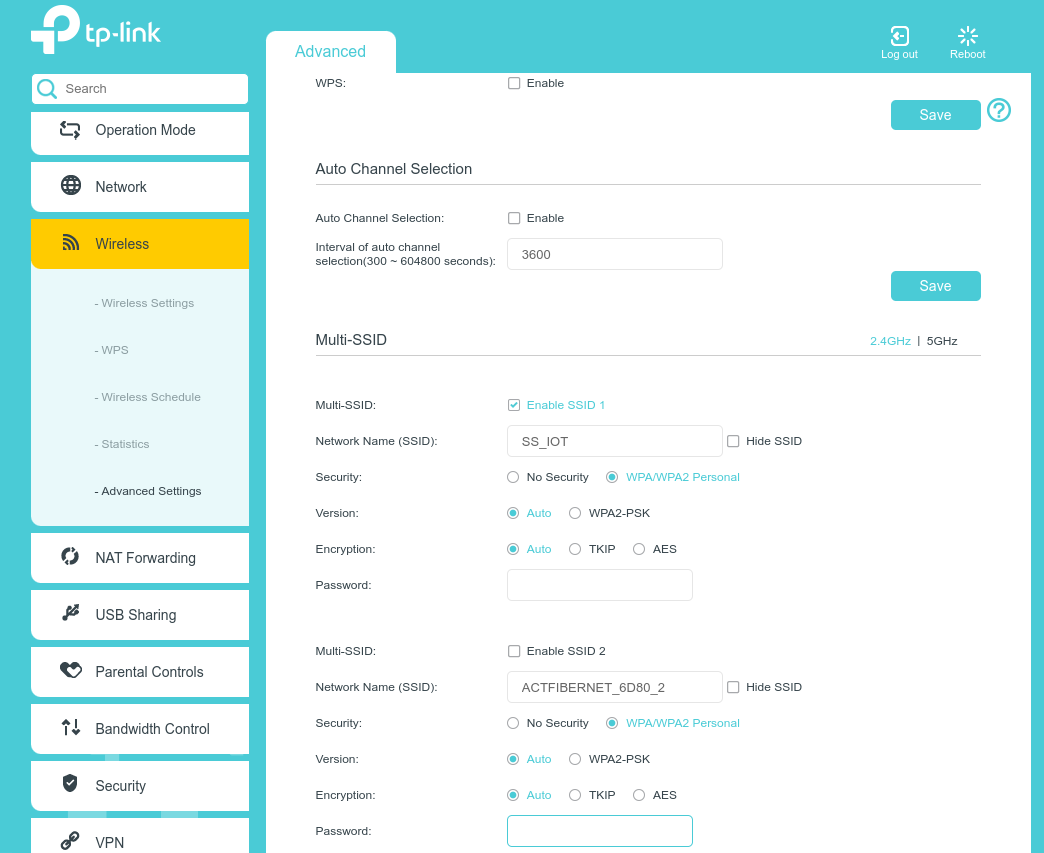
While approaching the VLAN setup, it’s worth noting that different router brands and even models within the same brand might use varying terminologies or methods to describe and configure VLANs. In the case of my TPLink router, instead of using the conventional term “VLAN,” it employs the term “Interface Grouping”.
For those familiar with VLANs, you might be expecting options to configure VLAN tagging. However, based on my experience with this specific TPLink model, I haven’t come across such an option. This absence makes me wonder if the router supports the full suite of VLAN functionalities or just a subset tailored to home networking needs.
For a visual insight, here’s an emulator for another TPLink router model. Even though it’s not the same model as mine, the underlying concept and interface layout should be roughly similar for other TPLink routers. It provides a simulated experience of the user interface, allowing users to navigate through various settings without actually being connected to the router.
On the other hand, if you’re using a DLink router, you’ll likely find a direct reference to VLANs in the interface, complete with options to tag VLAN traffic using unique identifiers. Such direct labeling might make the setup process a tad more intuitive for those already versed in networking concepts.
I set up the interface groups as follows:
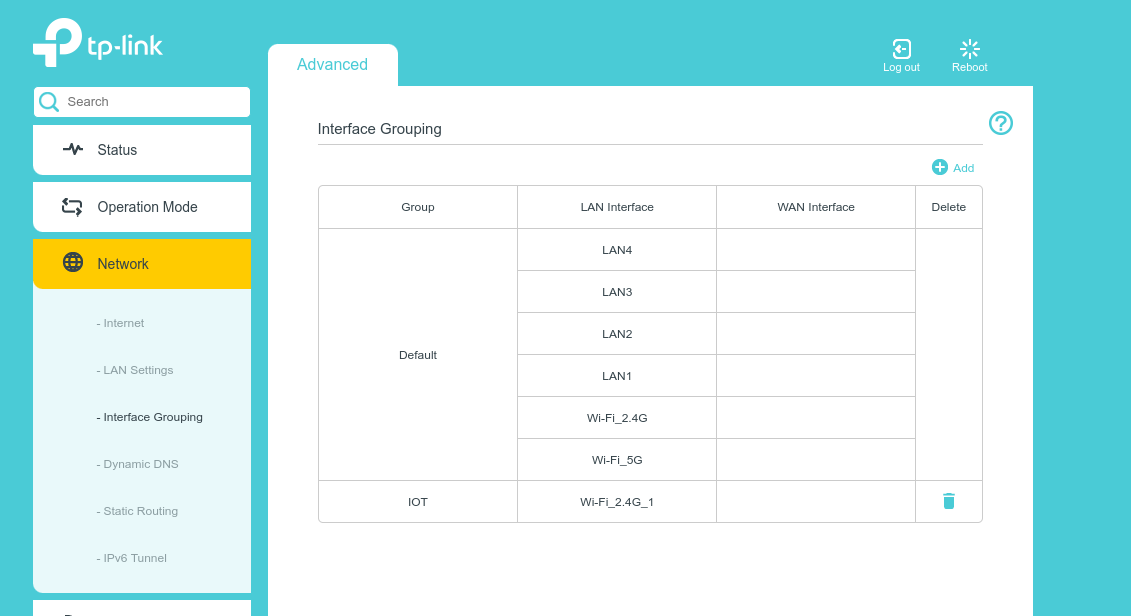
Upon examining the router’s configuration interface, you’ll observe that the WAN Interface column lacks specific entries. This omission isn’t a design flaw but rather an inherent characteristic of this router’s web UI. By design, the router automatically provides each interface group with access to the WAN, which implies that devices connected to the IOT group, or any other group for that matter, will have default internet access. While this might seem counter-intuitive for those aiming to restrict certain devices from internet access, this router comes with workarounds. Stay with me; I’ll delve into this nuance shortly.
An interesting feature to note is the router’s capability to automatically allocate a unique subnet for each new group created. In my scenario, the designated subnet for the IOT group was 192.168.2.0/24. While there’s flexibility to modify this DHCP allocation to suit specific needs, I found the default setting suitable for my requirements and chose to retain it.

When devices connect to the SS_IOT network, they are automatically assigned an IP address within the range of 192.168.0.100 to 192.168.0.199 based on the configuration we’ve set. However, given that these devices by default have access to the internet due to the WAN Interface settings, the crucial question becomes: How do we prevent them from reaching the wider web?
Enter TPLink’s crafty security feature known as Service Filtering. This functionality is especially useful for our purposes as it enables the administrator to halt all traffic (both TCP and UDP) from venturing out to the WAN, essentially the internet, for a specified range of IP addresses. In our setup, the goal is to halt all traffic for devices with IP addresses ranging from 192.168.2.100 to 192.168.2.199.
But, like many interfaces, this one isn’t without its quirks. One limitation I encountered was the system’s inability to recognize non-default subnets, limiting users to only interact with the Default group. However, every challenge has its workaround. By leveraging browser developer tools, I was able to edit the HTML directly on the configuration page, effectively bypassing the limitation. Someone slightly familiar with Chrome Developer Tools would be able to do this easily. I’ve documented the steps in a brief video tutorial to guide you through the process. Here it is:
With these configurations in place, we’re now in the clear. Devices on the IOT group are effectively siloed, ensuring they cannot communicate with the broader internet. Rest easy knowing that your network’s integrity is safeguarded.
Free Solution
In the digital age, it’s not uncommon for many of us to have a mini-museum of previous generation devices tucked away in drawers. In my collection, a pair of Pixel 4a smartphones stand out. While they may no longer be my daily drivers, these phones, equipped with respectable cameras, still have plenty of untapped potential. Their absence of a wide-lens is a minor compromise, especially when considering the possibility of repurposing them for home surveillance.
The Play Store is brimming with apps that can morph your smartphone into a functional IP camera. One standout for me is IP Webcam. This app is a comprehensive package, delivering nearly all the bells and whistles you might desire. Once activated, it initiates a webserver, making live streaming a breeze and additionally offers RTSP and ONVIF URLs. This compatibility ensures it can seamlessly interface with the majority of NVR software available, should you wish to archive footage.
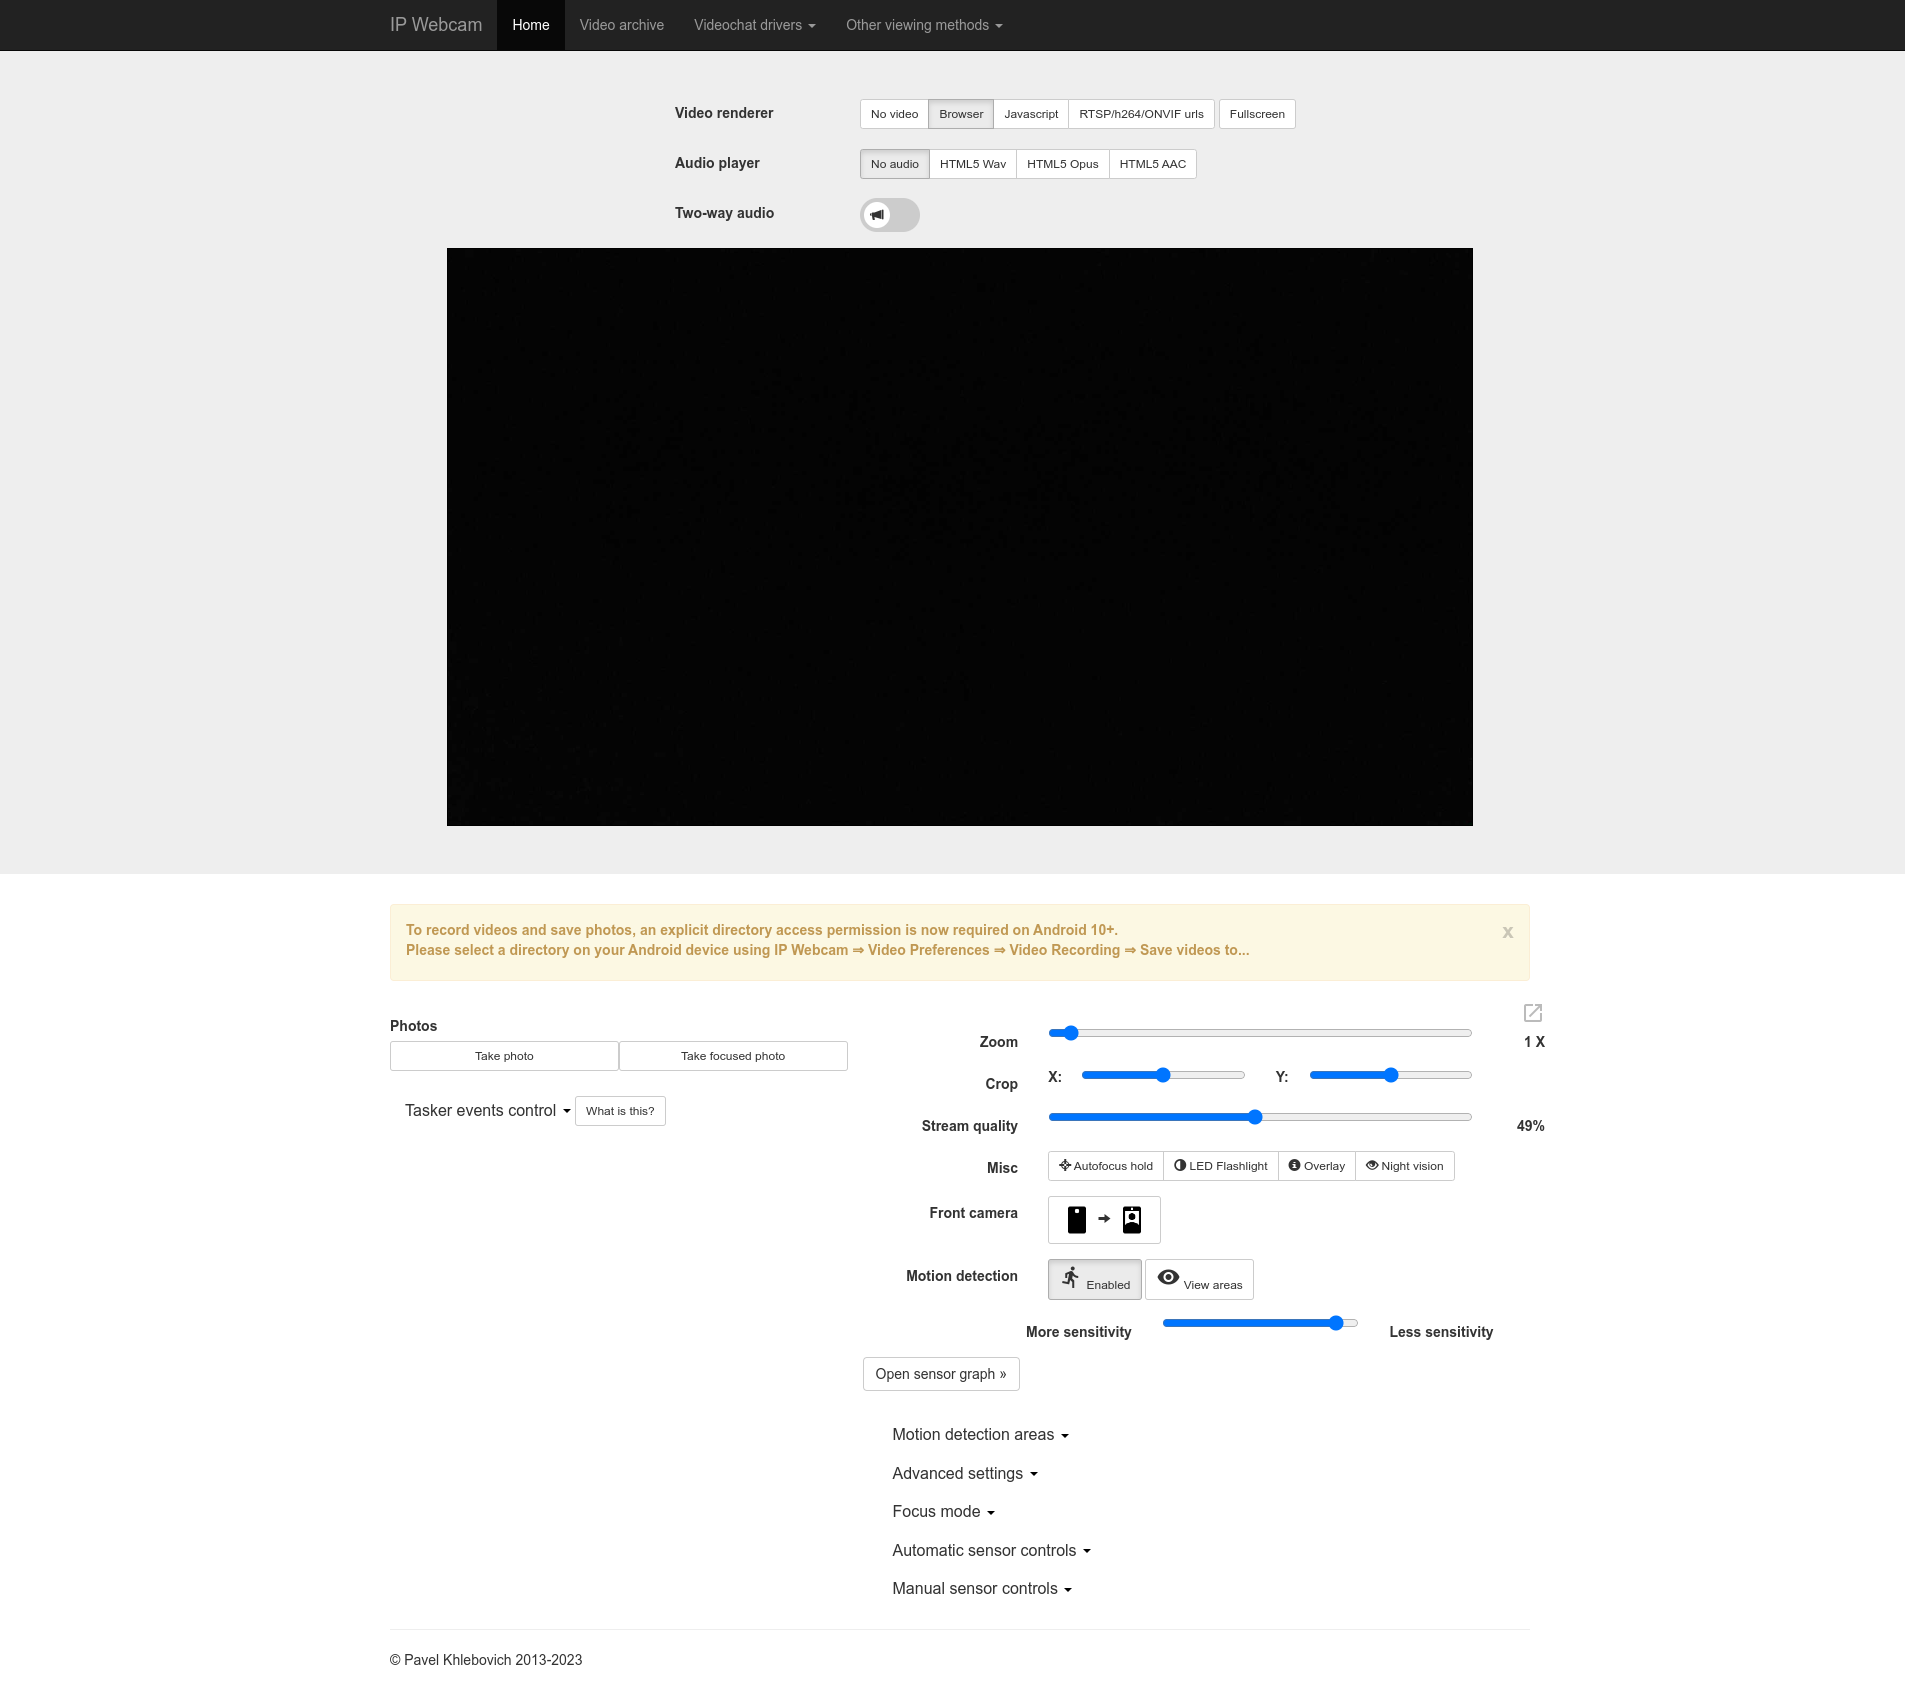
Beyond streaming, IP Webcam has another trick up its sleeve – a built-in WebRTC server. Though it operates with a self-signed TLS certificate, this feature paves the way for two-way communication. Tapping into the smartphone’s native capabilities, the app further offers functionalities such as digital zoom, motion detection, customizable view areas, and designated motion detection zones. And the cherry on top? All these features are easily adjustable straight from the web interface. To give you a better visual, here’s a snapshot of the interface:
Perfect! Leveraging an old smartphone in such a strategic manner not only breathes new life into the device but also provides a cost-effective solution to your surveillance needs. Moving on, let’s delve into the crux of the matter: Securely accessing this stream from outside your home network.
Given that the phone is tethered to the SS_IOT wireless network, it enjoys the luxury of being shielded from the outside world, ensuring that there’s no inadvertent data leakage from the camera. This serves as a foundational layer of security. However, the challenge now is to craft a safe conduit that allows you to tap into this feed when you’re away from home.
For the tech-savvy, zero-trust security is the gold standard. It operates on the principle that no actor, internal or external, is trusted by default. Every access request must be authenticated and authorized. So, let’s explore two methods to establish this zero-trust pipeline for your camera stream:
Cloudflare Tunnel
Cloudflare Tunnel offers a revolutionary approach to securing your applications, whether they reside on a public cloud or your private homelab. It reverses the old paradigm. Instead of leaving your applications exposed online and defending them with firewalls, Cloudflare Tunnel allows your servers or devices to establish outbound-only connections to Cloudflare’s edge. This ensures that your setup remains entirely insulated from direct internet access.
Now, combine Tunnel with Cloudflare’s Zero Trust security model, and you can append robust layers like Single Sign-On (SSO) and Access Control Lists (ACLs) to your applications. This is perfect for our pet cam solution, ensuring that only authorized individuals can view the stream.
Setting Up Cloudflare Tunnel for the Pet Cam
Starting with Cloudflare Tunnel is pretty straightforward, especially with their comprehensive documentation. But let’s give you a roadmap:
- WARP Client Installation: First and foremost, install the WARP client on your Raspberry Pi. This tool plays a pivotal role in directing the traffic towards our Android-based IP Webcam.
- Cloudflare Onboarding: If you’re venturing into the Cloudflare ecosystem for the first time, they’ll guide you through a smooth onboarding process. Do remember that Cloudflare prefers you to have your primary domain under their management for setting up a tunnel. I had an edge here since my domain was already managed by Cloudflare.
- Authentication Configuration: The next step involves setting up an authentication mechanism. Given the ubiquity of Google accounts, I chose Google SSO for this task. Both my partner and I use Google accounts, making this an ideal pick.
- Zero Trust Application Setup: With authentication in place, we move on to configuring our Cloudflare Zero Trust Application. This application will serve as the gatekeeper for our video feed, applying our Zero Trust rules. For instance, I set up an ACL specifying only
a@gmail.comandb@gmail.comcan access the feed. - Creating the Tunnel: The culminating step involves creating a tunnel pointing to our video feed’s endpoint. Since I aimed to leverage web-rtc functionality, it was crucial to redirect to the
httpsendpoint of the IP Webcam. A word of caution: IP Webcam uses a self-signed TLS certificate, so I disabled the TLS verification. Here’s a snapshot of my final configuration:
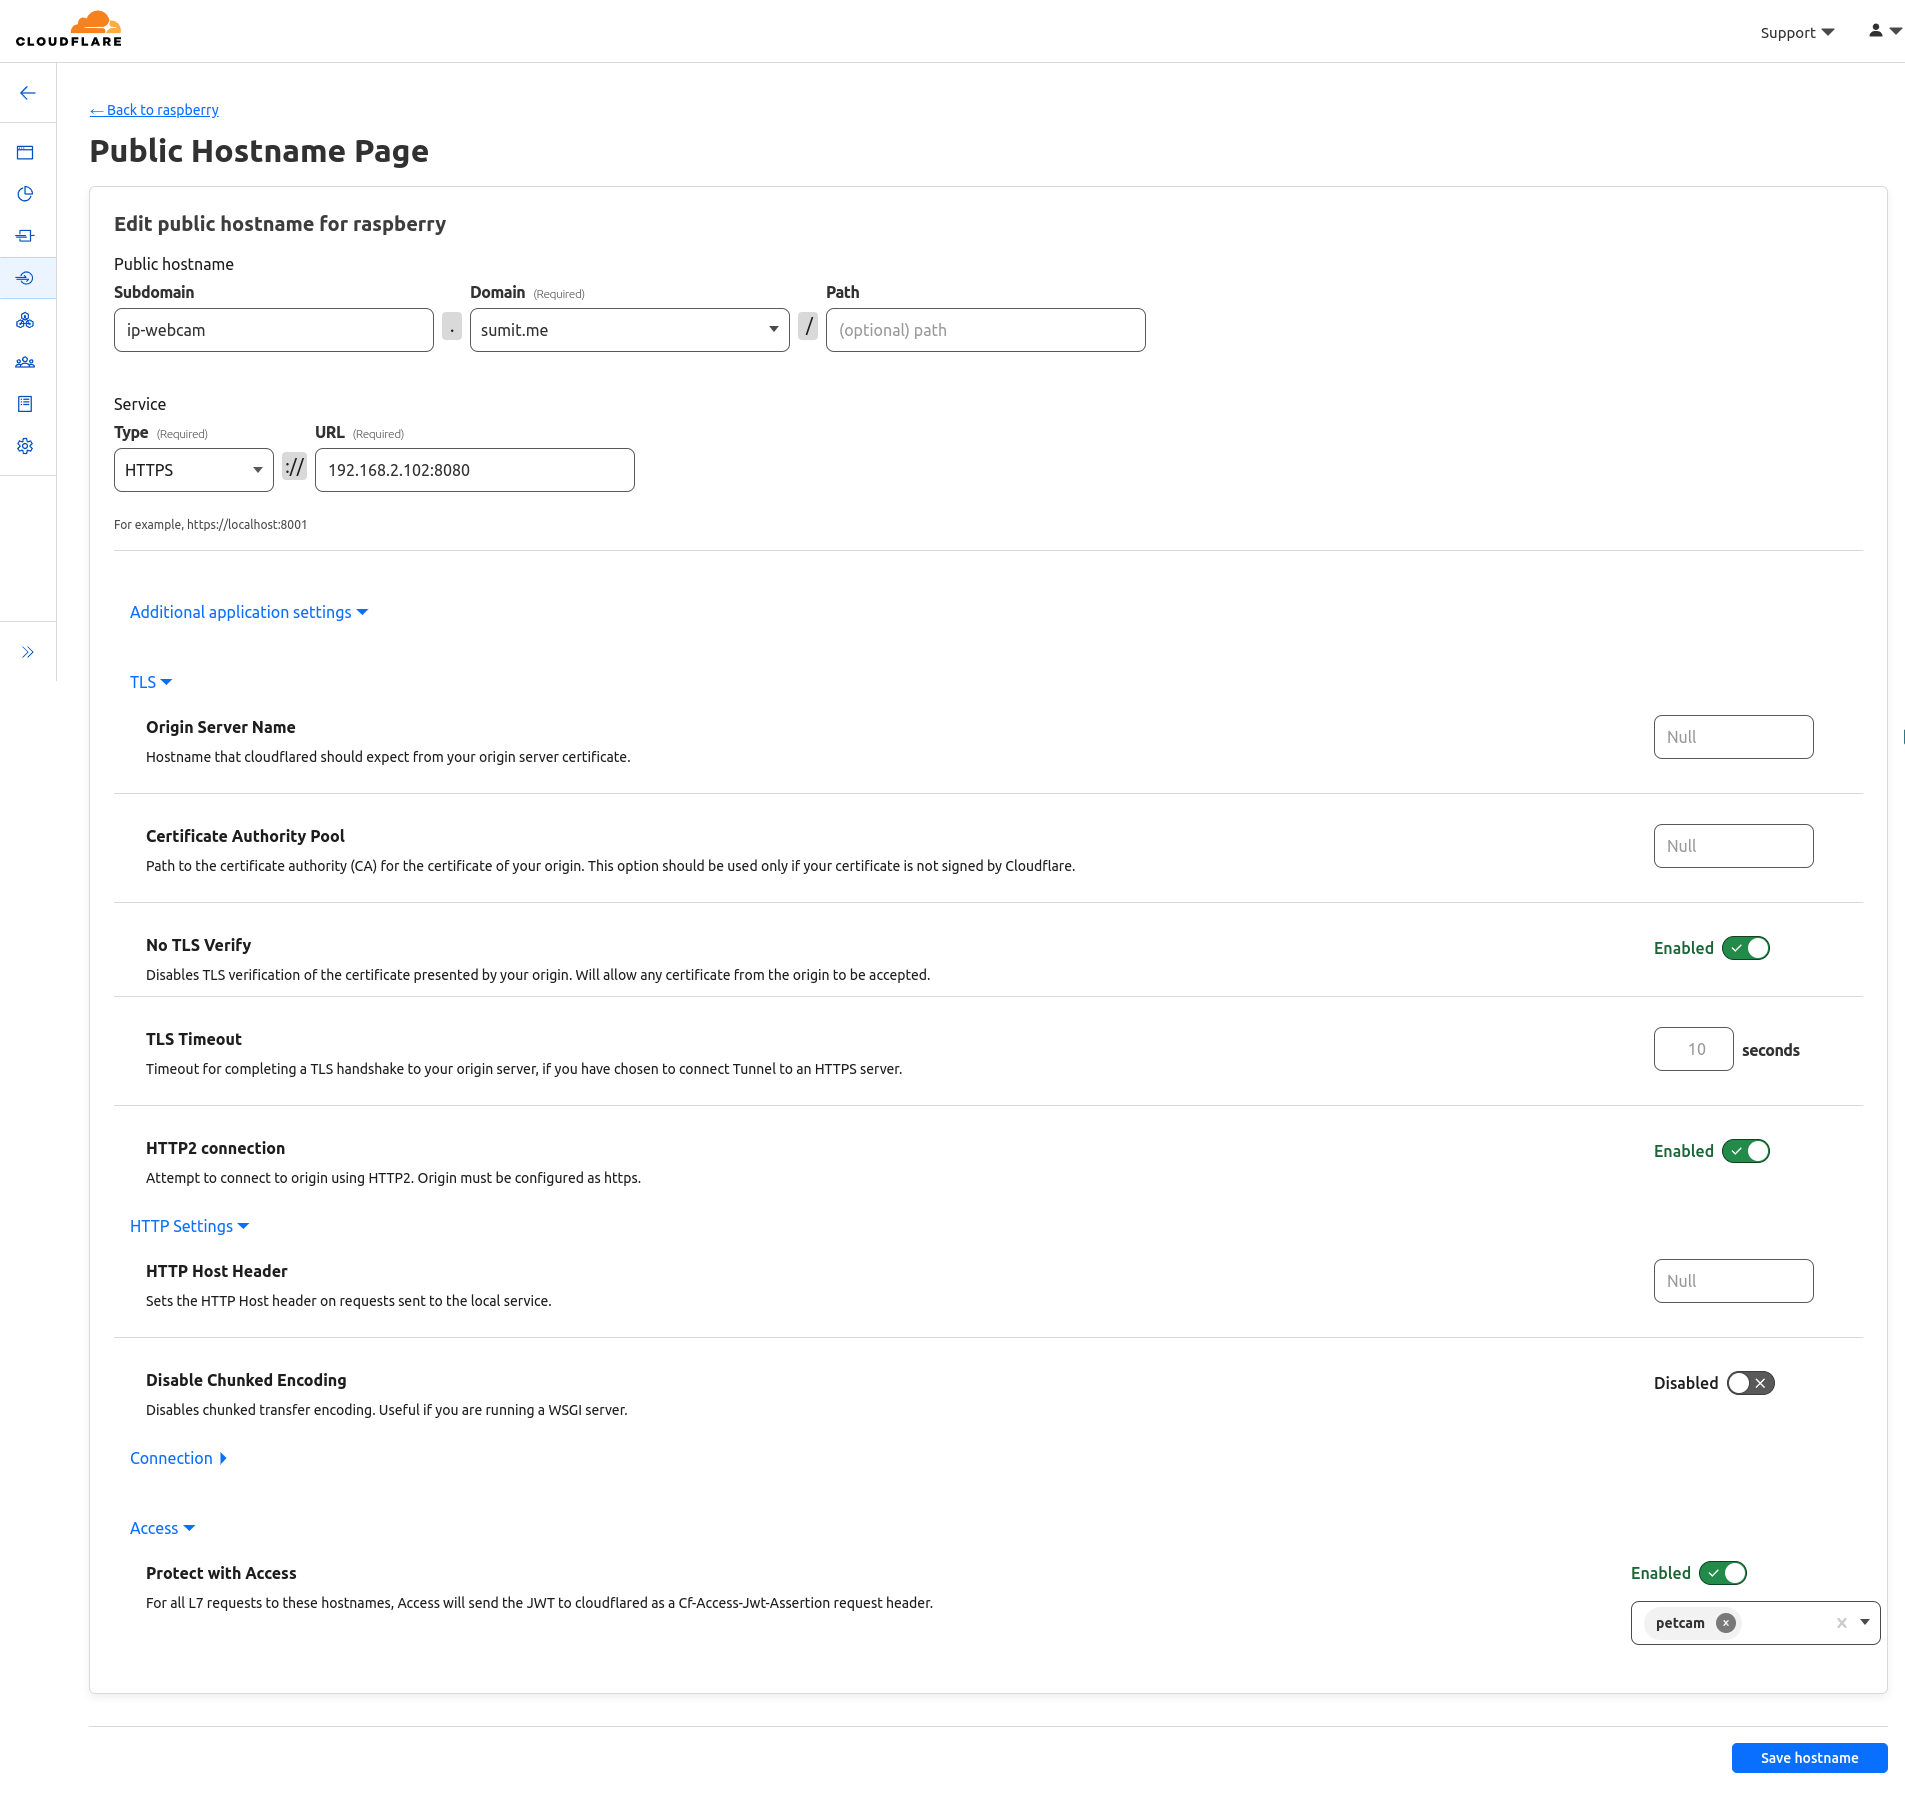
Thanks to Cloudflare Tunnel, I now access our pet cam stream via https://ip-webcam.sumit.me. Instead of a direct view, Cloudflare prompts for Google SSO authentication. A quick login, and there’s our IP Webcam dashboard. It’s not just about access, but secure access. With our set ACLs, only my partner and I can view the feed, keeping unwanted viewers out. A perfect blend of convenience and security.
Tailscale Funnel
Tailscale, built atop the robust foundation of WireGuard, is an innovative tool crafted for VPN creation. But it’s not just any VPN; Tailscale is optimized for creating Mesh VPNs, enhancing secure peer-to-peer connections. While you might think of VPNs as gateways to streaming international shows, Tailscale’s strength is its rich feature set that rivals Cloudflare Zero Trust. One of these standout features is the Tailscale Funnel, reminiscent of Cloudflare Tunnel, which I explored. Unlike some solutions, Tailscale liberates you from the necessity of owning an apex domain, thanks to its ingenious MagicDNS.
However, there’s a small hiccup: tailscale serve currently supports only localhost ports. But every challenge has a workaround! I swiftly navigated this by employing a reverse proxy on my Pi through Caddy(you could use the likes of Nginx or Apache as well). Here’s a glimpse of the command:
caddy reverse-proxy --from :2080 --to https://192.168.2.102:8080 --insecure`With this command, the IP Webcam dashboard springs to life at 192.168.0.xxx:2080, where 192.168.0.xxx is the Pi’s IP address. The subsequent step is a stroll through Tailscale’s comprehensive documentation to establish the funnel. A word of caution, though: I haven’t yet unearthed a way to integrate SSO into the funnel or restrict access to the public endpoint. But I remain optimistic – it’s a puzzle I’ll piece together in the future!
Challenges with this setup
While the Cloudflare solution met my requirements, using Android phones as cameras presented problems:
- Overheating: Continuous camera use caused the phones to heat up significantly.
- Hardware Concerns: This heat isn’t good for the phone’s internal components or its battery.
- Safety Risks: Extended use could turn the battery into a fire hazard.
- System Warnings: Android regularly warned about the device’s high temperature, often shutting it down for safety.
In conclusion, while repurposing phones seemed economical, the setup isn’t viable for long-term use due to these issues.
Venturing back into Affordable Amazon Cameras
Having successfully streamed content over my home network and onto the internet with robust security, I started to ponder: Could I replicate this success with Amazon’s IP Cameras? They may not come with a built-in web dashboard, but what if they supported RTSP streams?
My search led me to the TPLink Tapo C110 camera. A closer look revealed it promised an RTSP endpoint and was also ONVIF compliant. This was promising, as it indicated compatibility with a range of open-source software solutions such as ZoneMinder, iSpy, Shinobi, and Frigate. Out of the options, Frigate caught my eye, but while its AI features were impressive, I didn’t really require them. Additionally, the Raspberry Pi may not have the horsepower to fully exploit such features.
Getting the Camera Online
Diving into the Tapo camera setup meant a brief engagement with the Tapo app. Despite my reservations, I proceeded to install the app on my phone. Armed with a disposable email account, I embarked on the setup journey:
- Power Up & Connect: First, I installed the Tapo app on my phone. As much as I hesitated, it’s a necessary step. I registered using a temporary email, eager to move past this phase.
- Network Connection: After powering up the camera, the app connected my phone to a wireless network the camera generated. It then prompted me to select the desired network for the camera itself. I chose the
SS_IOTSSID. Given it’s segregated into a separate VLAN, it’s isolated from the internet — ensuring that bit of privacy I’m after. During this stage, I oriented the camera towards a wall and momentarily disabled the Service Filtering rules on my router (I’ll dive into the reasons shortly). - Finalizing Setup: Despite completing the network setup, the Tapo app raised an error. Nevertheless, the camera successfully connected to the network.
The rationale behind temporarily disabling Service Filtering? It was all about gaining control. By doing so, I could fine-tune specific settings like the stream’s resolution and establish credentials for the RTSP stream. Once finalized, I reinstated the Service Filtering rules, effectively placing the camera back into an internet-free zone. An odd quirk emerged — the camera’s LED turned red, suggesting a malfunction. In reality, it was working just fine. It seems disregarding the app’s guidelines is the way forward in this journey towards privacy!
Setting Up RTSP Streaming with go2rtc
In my quest to find the ideal software solution for RTSP streaming, after numerous GitHub dives and some hands-on experiments, I found my way to the go2rtc project. Not only was it a lifesaver that spared me from writing code to convert RTSP to HLS using ffmpeg and then stream it using something like hls.js, but it also packed a feature set that was a perfect match:
- RTSP-to-Webpage Streaming: It effortlessly pushed the RTSP feed to a webpage.
- WebRTC Support: It came built-in with a WebRTC page, allowing two-way communication.
Plus, it was lightweight enough to hum along smoothly on my Raspberry Pi!
Setting up go2rtc was a breeze. I spun up a Docker instance and configured it for streaming. For my Tapo camera, the configuration looked something like this:
streams:
    camera.tapo1.living:
        - tapo://admin:BB33B54119D494695C25D51E7D7C457D@192.168.2.100
In this setup, the intricate password BB33B54119D494695C25D51E7D7C457D is an uppercase version of the MD5 hash of the initial password I used while signing into the Tapo app.
The moment I had this configured, I was streaming live footage within my home network. And thanks to the prior setup with Cloudflare’s tunnel, my stream was also accessible over the internet, safeguarded behind SSO and ACL layers.
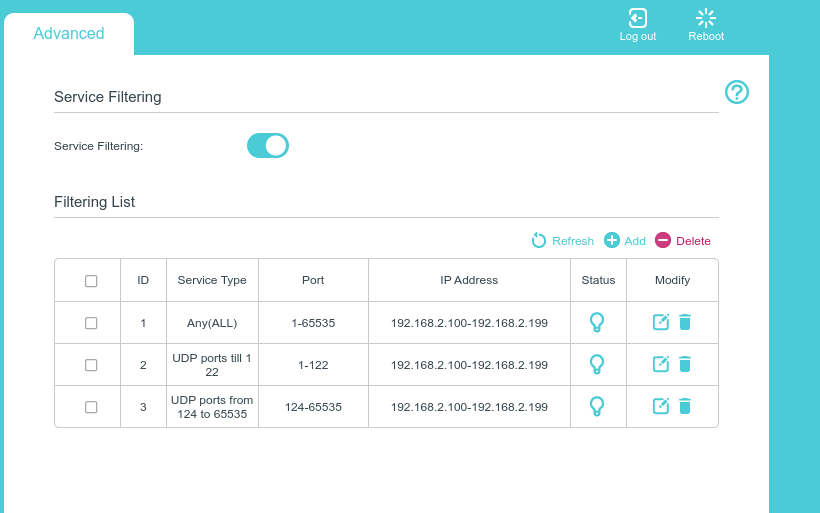
A small hiccup arose with the camera’s need to sync with an NTP server for date and time updates, essential for its automatic night mode feature. I quickly sorted this by opening the UDP port 123. Everything else remains closed. This is how the new Service Filtering rules look like:
That’s a wrap
Concluding my camera venture, I find myself satisfied with the final configuration.
- One TP-Link Tapo C110 camera.
- Streams being captred by go2rtc running on a docker container on the Raspberry Pi.
- Stream dashboard being exposed over the internet with Cloudflare Tunnel with SSO and ACL enabled on it.
I’d be buying one more camera for coverage in another room.
This journey took me down fascinating tech alleys, deepening my understanding of VLANs, introducing me to the dynamic offerings of Cloudflare, and unraveling the intricacies of ffmpeg, RTSP, and HLS streams. I wrote a fair amount of code while learning these tools. Along the way, I stumbled upon several intriguing GitHub projects. One that caught my eye was gotapo. My next aspiration?
- Integrating it into a sleek web UI. This would allow me not just to view streams, but also to deftly manage camera features like privacy mode, night mode, the LED, and even remote reboots. Onward to the next tech adventure!
- Attempt to hack the firmware and have the camera host the web dashboard. Inspired from these posts
Here are some other notable projects I came across along the way which taught me a ton on how the Tapo cameras can be interfaced with: